Managing the changes for 1099s in QuickBooks 2009 and earlier
Did you pay some of your 1099 vendors with a mix of checks, credit card, electronic funds transfer, debit card, PayPal, and direct deposits–that is, both reportable and non-reportable payment methods? Have you completed Step 1 and Step 2 on the Managing the changes for 1099s in QuickBooks 2009 and earlier page?
If you’ve used both reportable and non-reportable payments to pay any of your 1099 vendors, you’ve got some more work to do.
Step 1: Look at each vendor’s reportable and non-reportable payments
What do I do?
Take a look at all the payments you’ve made to each 1099 vendor that you’ve paid with both reportable and non-reportable methods. I’ve suggested a couple of ways to do this.
Method 1: Use the 1099 Detail Report
What do I do?
- Run a 1099 Detail report from the Reports menu by selecting Reports > Vendors & Payables > 1099 Detail.

- Find your non-reportable payments. These are the kinds of transactions you’re looking for:
- Credit card payments
- Check-style transactions that represent debit card charges or PayPal payments
- Bills that are paid by debit or credit cards
- General Journal entries that represent non-reportable payments
- If you want to create a good graphic view of your payments, export all transactions to a spreadsheet. On the example spreadsheet, non-reportable payments are color-coded yellow, and reportable payments are colored light green.

Method 2: Use the Vendor Center
- Open the Vendor Center.
- Select one of your 1099 vendors.
- Select All Transactions.
- Choose a date range that includes the entire reporting period—for tax year 2011, that’s 1/1/2011 – 12/31/2011.
- Find non-reportable payments in the lower pane of the window. These will look like:
- Bills paid via a Bill Pmt –Credit card
- Checks with the check number DEBIT
- Checks written from a bank account named PayPal
- Credit card charges
- General Journal entries that represent non-reportable payments
Step 2: Total your reportable payments, then total your non-reportable payments
In whichever view of your vendor’s payments you’ve chosen, add up your reportable and non-reportable totals.
What do I do?
- Separate the non-reportable payments from the reportable payments.
- Add up the non-reportable payments and note the total.
- Add up the reportable payments and note the total.
Step 3: Remove vendors whose reportable payments don’t meet threshold amounts
If reportable payments to a vendor for all the 1099 boxes that apply are less than the 2011 threshold amounts, you don’t need to send that vendor a form 1099-MISC.
What do I do?
- Open the Vendor Center (Vendors > Vendor Center).
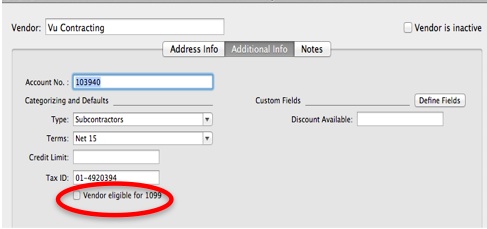
- Double-click the name of the 1099 vendor whose reportable payments don’t meet the thresholds. Click the Additional Info tab.
- Uncheck the 1099 checkbox.

Step 4: Add journal entries for non-reportable payment totals
When you’ve got a vendor you’ve paid more than the thresholds using reportable methods, but you’ve also made payments to that vendor using non-reportable methods, you have a few more steps to take.
You need to calculate the total amount of non-reportable payments for that vendor, then create a journal entry to move money around so that QuickBooks sees only the reportable payment totals when you create and print your 1099-MISC forms.
What do I do?
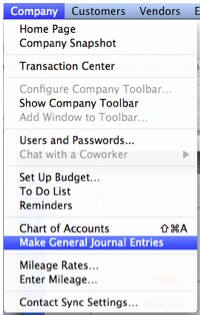
Create General Journal entries for each vendor, dated for the last day of the tax reporting year (12/31/2011).
- Credit the total non-reportable amount to a 1099 account, so that QuickBooks will not see or include the non-reportable payments when it’s creating 1099-MISC forms to print.
- Pick a non-1099 account to debit, so that your books remain balanced and the non-reportable payments don’t get lost while you’re working with your 1099s.
- Enter the 1099 vendor name next to the journal entry along with a note like “1099 adjustment—temporary” to remind yourself why you made this entry.

Step 5: Confirm your results
Thank goodness, it’s time to confirm your results using the 1099 Detail report.
- Be sure to close the 1099 Detail report if you’ve still got it open.
- Create a new 1099 Detail report to verify your work at Reports > Vendors & Payables > 1099 Detail.
- Read over the report to make sure that the amounts you’re reporting are reduced as a result of the journal entries you just made.
Step 6: Create your 1099 forms
You’re finally ready to actually create your 1099 forms, so go to Vendors > Print 1099s.
If you need help creating and printing your 1099s, this article can get you rolling.
Tip: Starting with tax year 2011, the IRS has changed the layout of the 1096 form. If you use QuickBooks 2009 or earlier, you’ll need to fill out your 1096 form by hand this year. Be sure to put the X in the 1099-MISC box, not the 1099-K box.
Step 7. Finish up
Remember to delete the journal entries you created so that your financial statements aren’t affected later on.
Congratulations—you’re finally done! After all that, I hope you can take the rest of the day off!


