Part 1: Overview | Part 2: Vendor transactions | Part 3: Customer transactions | Part 4: Banking and other
 This is the third in a series of articles about how to get your historical data into QuickBooks. In my first two articles, I gave you a brief overview of what you need to know before you start and talked about getting vendor-related data into QuickBooks. If you haven’t already, it’s a good idea to read over that first article before continuing. In this article, I’m going to talk about entering the transactions you used with your customers.
Customer transactions you need to enter are:
- Estimates
- Invoices
- Sales receipts
- Refunds and credit memos
- Payments received
Gather the information you’ll need
Depending on the type of business you have, you may not need to gather all of this information. So if something in this list doesn’t apply to you, just ignore it. One important thing to remember: you only need to enter the transactions from the start date you entered when you created your company file until today. You don’t have to go back to the beginning of your business and enter years of information. (Whew.)
Whether you’ve been keeping paper or electronic records, or a mixture, here’s what to gather up:
- Any estimates you’ve sent to customers or potential customers. (You don’t have to enter ones for jobs or sales you didn’t get, but you can if you want to.)
- Invoices you sent to customers, regardless of whether you’ve received payment yet.
- Any credit memos you’ve issued.
- Records of payments you’ve received from customers.
- Records of refunds you’ve given.
- Records of deposits of customer payments you’ve made to your bank.
- Record of sales tax payments you’ve made.
- If you sell things, details of what you sold, preferably grouped to correspond with deposits of your sales income and records of deposits from sales receipts you gave.
Entering transactions
Now you’re ready to go. As with vendors, if you haven’t set up your Items or Customers lists yet, you’ll be asked to add these as you go along. Go ahead and do that. You can go back to these lists later to enter more detail.
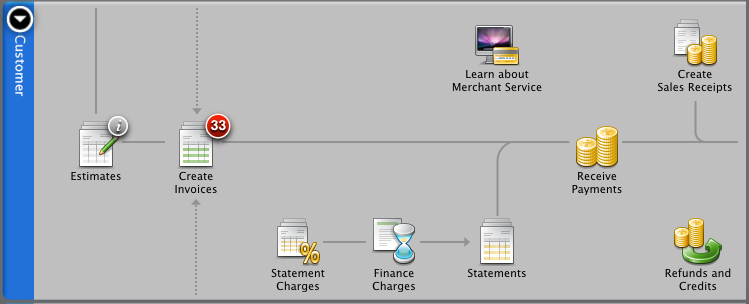
You can use the Customer area of the Home page to enter most of the transactions I talk about here. (I’ll tell you where to enter the others.) Remember, you only need to enter the transactions between your company file’s start date and today.
OK, now start entering your sales transactions in this order. Be sure to enter the correct transaction date for each one.
- Estimates. If you use estimates, you’ll need to first turn on this feature. Choose QuickBooks > Preferences and select Sales and Invoicing to turn on estimates. Then go back to the Home page and click Estimates. The estimates you create will be the basis for other sales transactions such as invoices. You don’t have to enter estimates for jobs or sales you didn’t get, unless you just want a record of them.
- Invoices. Click Create Invoices and create a copy of each invoice you’ve written between your company file’s start date and now. Be sure you enter items in the Item field so QuickBooks can track your sales in the correct accounts.
- Sales receipts for cash sales. If you were paid for work or goods on the spot, you probably gave your customer a sales receipt. Click Sales Receipts and enter copies of your sales receipts from your start date until today. Be sure to enter the amount of each item you sold and received payment for at the time of sale. You can also enter multiple sales on one sales receipt form if you don’t track sales by customer. If possible, group them so that the money received from cash sales matches actual bank deposits. That’ll make it easier to record deposits.
- Refunds and credit memos. Click Refunds and Credits and enter returns that may have occurred from the invoices and sales receipts you’ve already entered.
- Payments. Click Receive Payments and record each payment received from a customer for an outstanding invoice. Be sure that you apply the payment to the appropriate invoice and that the Date field shows the payment date. If the payment was for all or part of the customer’s open balance as of the start date, you’ll see a QuickBooks invoice for that balance.
- Deposits. For this one, you’ll venture out of the Customer area of the Home page and go to the Banking area. Click Record Deposits and record each deposit of a payment you’ve received; be sure to select all customer payments (whether for invoices or sales receipts) deposited on one date. Then click OK. In the Make Deposits window, be sure the Date field shows the deposit date.
- Payments of sales tax. For this one, you’ll go to the Vendor area and click Pay Sales Tax. (I know. This article is about customer transactions, but you’re collecting from customers and paying a vendor so it’s a gray area. Stick with me.) In the Pay Sales Tax window, record each payment you made of sales tax you collected. Be sure that you enter the amounts you actually paid the sales tax agencies and that the Date field shows the payment date.
That’s it for entering customer transactions! In the next article in this series, I’ll talk about entering banking and credit card transactions.
[Special thanks to Maria Langer and her QuickBooks 2011 for Mac guide for contributing to this article.]


